T2002 - der Spiele Test zum Turrican Klassiker
Es gibt wohl kaum einen Spieler, der noch nie von dem Amiga-Spiele Klassiker Turrican gehört hat. Der erste Teil der Spielereihe wurde bereits im Jahre 1990 auf dem C64 veröffentlicht und es folgten eine Reihe an Portierungen, sowie zudem auch etliche Nachfolger, die auf verschiedenen Systemen veröffentlicht wurden. So wie zum Beispiel das Freeware-Spiel „T2002„, bei dem es sich eine Neuauflage von Turrican 2 handelt, die von einer Reihe von Hobby-Entwicklern stammt und im Jahr 2002 auf dem PC veröffentlicht wurde.
Und Dank der in dem Spiel verwendeten Originalgrafiken und Sounds versetzt T2002 sowohl junge, als auch alte Spieler wieder zurück in das Jahr 1990, eine Zeit in der die Grafik eines Spiels fast schon nebensächlich war.
Der Einstieg in Turrican T2002
Konnte das Original Turrican 2 aus dem Jahre 1991 noch mit einer Story aufwarten, verzichtet T2002 vollständig auf eine solche Geschichte. Doch diese ist auch gar nicht zwingend nötig, denn in den sieben Levels der Neuauflage geht es stets darum den jeweiligen Ausgang zu finden und auf dem Weg dorthin jeden Gegner zu vernichten, der sich einem in den Weg stellt. Den Ausgang eines Levels zu finden ist dabei in der Regel gar nicht so schwer, da dem Spieler der Weg dorthin vereinzelt durch die in den Levels verteilten Exit-Pfeile angezeigt wird.
Im Gegensatz zu dem Original wurden sämtliche Level für die Neuauflage komplett neu gestaltet, wenngleich Kenner des Originals auch in T2002 auf einige altbekannte Widersacher treffen werden. Und an dieser Stelle muss man dann auch den Entwicklern von Pekaro Software einmal ein großes Lob aussprechen, denn die sieben enthaltenen Level sehen allesamt nicht nur unterschiedlich aus, sondern auch die Musik in diesen Unterscheidet sich stets voneinander. Das ist durchaus eine große Leistung für die drei Hobby-Entwickler, die im Jahr 2002 dafür gesorgt haben, dass seitdem endlich auch PC-Spieler in den Genuss des C64/Amiga-Spieleklassikers Turrican 2 kommen.
T2002 – die Funktionen im Spiel
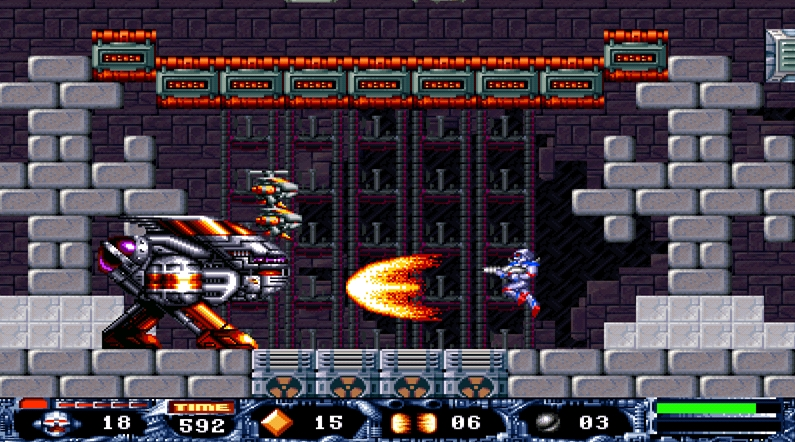
Die Jump’n’Shoot-Spiele aus der Turrican-Reihe konnten seit jeher vor allem durch ihr schnelles und Actionreiches Gameplay überzeugen. Und dies haben selbstverständlich auch die Entwickler für ihre Neuauflage T2002 übernommen. So stehen den Spielern unter anderem mehrere unterschiedliche Waffen zur Verfügung, mit denen diese die Bedrohungen in den sieben Levels eliminieren können. Außerdem verfügt der Spieler über insgesamt drei verschiedene Schussvarianten, welche sich in Multiple, Bounce und Laser unterteilen, doch von denen jeweils nur eine zur selben Zeit genutzt werden kann.
Welche Schussvariante man gerade verwenden kann, das richtet sich in T2002 danach, welche man zuvor als letztes eingesammelt hat. Und umso mehr Objekte derselben Schussvariante der Spieler in der Folge in den Levels einsammelt, desto stärker wird daraufhin auch dessen Waffe. Zudem kann der Spieler, wenn dieser steht, bei gedrückter Schusstaste einen weiteren Feuermodus aktivieren und neben 2 Extrawaffen, die eingesammelt werden können aber über einen begrenzten Munitionsvorrat verfügen, kann sich Turrican auch in ein Rad verwandeln und ist in dieser Form nicht nur unverwundbar, sondern verursacht auch einen großen Schaden bei seinen Widersachern.
Aufgrund der Tatsache, dass in den sieben Levels des Spiels überall Extraleben und andere Boni versteckt sind, lohnt es sich zudem auch, sich nicht immer auf direktem Weg zum Ende eines solchen zu begeben, sondern dieses zunächst einmal möglichst gründlich zu durchforsten. Denn sammelt man innerhalb der Levels beispielsweise 100 Diamanten ein, dann bekommt man hierfür ein „Continue“, welches man einsetzen kann, wenn man einmal alle seine Leben verloren haben sollte. Und das kann besonders in dem höchsten, der drei anwählbaren Schwierigkeitsstufen, durchaus schon einmal vorkommen.
Erschwerend kommt für den Spieler außerdem auch noch hinzu, dass dieser eines seiner Leben verliert, sollte er ein Level nicht innerhalb einer vorgegebenen Zeit, die in Form eines Timers ständig weniger wird, beendet haben. Ist diese Zeit einmal abgelaufen, dann verliert der Spieler ein Leben und der Timer wird neu gestartet.
Extras von T2002
Spieler, die auch nach dem Durchspielen von T2002 nicht genug von dem klassischen Turrican-Gameplay bekommen können, haben dank des Level-Editors zudem die Möglichkeit, sich an den vielen von Fans erstellten Levels zu versuchen oder sogar ihr eigenes zu erstellen. Hierfür ist allerdings zunächst ein Download des „T2002E“ Updates erforderlich, welche man separat herunterladen kann. Eine ausführliche Anleitung zum T2002 Level-Editor findet Ihr auf Turrican Forever.
Weiterhin wurde im Jahr 2012 für T2002 das Turricane 3.5 Final Mission Mappack veröffentlicht (siehe http://www.pekaro.de/t2002.html), welches die beiden Klassiker aus dem Jahre 1993, Turrican 3 (C64 und Amiga) und Super Turrican (Super Nintendo), erstmals auch auf die Bildschirme der Computerspieler bringt. Um die Erweiterung zu spielen, müssen ausschließlich die Hauptversion von T2002, sowie das Update, heruntergeladen werden und schon steht dem stundenlangen Spielspaß nichts mehr im Weg.
Systemvoraussetzungen vom Turrican Klassiker T2002
Bei T2002 handelt es sich um eine Neuauflage des Jump’n’Shoot Klassikers Turrican2, welche bereits im Jahr 2002 für den PC veröffentlicht wurde. Aus diesem Grund dürfte der Titel heute auch auf nahezu sämtlichen Computern der Spieler laufen, zumindest sofern es sich bei diesem um einen Windows-PC handelt. Denn eine Version des Spiels, die auch auf Computern mit MacOS lauffähig ist, existiert bislang noch nicht. Dafür dürfte das Spiel jedoch zumindest auch auf einem Großteil der erhältlichen Laptops ohne jegliche Probleme funktionieren, was nicht zuletzt der, für heutige Verhältnisse, wenig aufwendigen Grafikdarstellung geschuldet ist.
Die Größe des Downloads von gerade einmal 38,5 MB sollte nur wenigen Anwendern heutzutage Kopfzerbrechen bereiten. Ebenso wie auch die 147 MB, welche für den Download des Turricane 3.5 Level-Pack benötigt werden, welches die Neuauflagen von Turrican 3 und Super Turrican auf den PC bringt.
Fazit zum Turrican Test von T2002
Mit T2002 brachten die Entwickler von Pekaro Software (Internet: http://www.pekaro.de) die Turrican-Reihe im Jahr 2002 erstmals auch auf die Bildschirme von PC-Spielern, die sich seitdem an der Neuauflage des herausfordernden Jump’n’Shoot Klassikers aus dem Jahre 1990 versuchen dürfen. Und dank des Turricane 3.5 Final Mission Mappacks, welches im Jahr 2012 veröffentlicht wurde, können sich PC-Spieler seitdem außerdem auch an den Neuauflagen von Turrican 3 und Super Turrican versuchen. Dieses Mappack steht den Spielern, wie auch T2002 selbst, im Internet kostenlos zum Download bereit und dürfte auf einem Großteil der heutigen PCs ohne jegliche Probleme laufen.